From OAuth to OpenID: The Evolution of Web Authentication

In today’s interconnected digital world, granting secure access to web applications and protecting user identities are vital concerns. Two foundational protocols, OAuth and OpenID Connect, have emerged to address these challenges.
In this article, by exploring the intricacies of OAuth and OpenID Connect, we will gain insights into their historical context and the pivotal roles they play in securing modern applications. We’ll examine the fundamental components, security considerations, and essential flows that underpin these protocols, equipping you to build secure and user-friendly digital experiences.
OAuth
The OAuth protocol has its roots back in 2006 when Blaine Cook, then working at Twitter, was trying to solve the problem of allowing third-party websites to access user data without requiring the user’s password. This led to the development of an open standard for token-based authentication, which became known as OAuth.
OAuth 1.0 was officially released in December 2007 as an open standard for access delegation. It provided a method for clients to access server resources on behalf of a resource owner, such as a different client or an end-user. It also allowed users to grant third-party applications access to their data without sharing their passwords, thus improving security.
The complexity of OAuth 1.0 led to the development of OAuth 2.0, which was released in October 2012. OAuth 2.0 aimed to build on the success of OAuth 1.0 while eliminating its complexities. It introduced a more straightforward and flexible authorization framework.
OpenID
While OAuth is all about authorization (providing access to specific functionalities or data), OpenID is about authentication (validating a user’s identity). Initially, these two protocols were developed independently to address different aspects of online identity management. However, with the release of the OpenID Connect, the OAuth 2.0 capabilities has been integratied to OpenID. More specifically, OpenID Connect implements authentication as an extension to the OAuth 2.0 authorization process.
OpenID Connect is a simple identity layer on top of the OAuth 2.0 framework, which allows clients to verify the identity of an end-user based on the authentication performed by an authorization server. In other words, OpenID Connect explains how to perform secure user authentication on top of OAuth 2.0’s secure authorization.
From OAuth 2.0 to OpenID Connect
As the OAuth 2.0 specification suggests, OAuth offers a comprehensive authorization framework. However, due to its highly extensible nature and numerous optional components, this framework, when used in isolation, may lead to a wide range of non-interoperable implementations.
In contrast, OpenID Connect addresses the lack of concrete guidance in the OAuth 2.0 specification by providing specific instructions on how OAuth 2.0 should be implemented. It accomplishes this by leveraging existing OAuth extensions, such as JSON Web Tokens and OAuth 2.0 Multiple Response Type Encoding Practices, thereby promoting a more standardized and interoperable approach.
Since that authentication is the main goal of the OpenID Connect protocol, it offers useful extensions for identity discovery:
- The ID Token is a data structure that encapsulates essential information about the user’s identity. An end-user can be unequivocally identified using a combination of two fields from the ID Token: ‘sub’ (Subject Identifier) and ‘iss’ (Issuer Identifier).
- Claims, which are pieces of information asserted about an end-user, can be retrieved through a standardized UserInfo endpoint. These claims provide additional user details.
Be aware that OpenID Connect and OAuth 2.0 use different terminology, and in this article, both terms could be used interchangeably. The following table summarizes the differences:
| OAuth 2.0 | OpenID Connect |
|---|---|
| Authorization Server | OpenID Provider |
| Client | Relying Party |
| Resource Owner | End-User |
To enable authorization Authorization Server must implement two essential HTTP endpoints defined in the OpenID Connect specification.
The Authorization Endpoint (uses the following URL format https://example.com/authorize{?response_type,client_id,redirect_uri,scope,nonce}) plays a crucial role in the authentication process. It is a fundamental part of the OpenID Connect flow and is responsible for initiating the authentication process and obtaining the user’s consent to release their identity information to the client application.
When a user wants to authenticate with a client application, the client application redirects the user’s browser to the Authorization Endpoint of the Authorization Server. This redirection is typically done through a URL containing specific query parameters that define the details of the authentication request. The key parameters sent to the Authorization Endpoint include:
- client_id: The client identifier issued by the authorization server when the client application was registered.
- redirect_uri: The URI to which the authorization server will redirect the user after the authentication is complete. This URI must be pre-registered with the authorization server for security reasons.
- scope: The requested scope of the Access Token. It indicates the level of access requested by the client application (e.g.,
openidfor authentication,profilefor user profile information, etc.). - nonce: A required parameter for the Implicit Flow and Hybrid Flow. It is a random value used to associate the ID Token with the client application and prevent replay attacks.
- response_type: This parameter specifies the type of the response requested. It indicates the flow to be used for obtaining tokens. The following table summarizes possible response_type values:
- code:Authorization CodeFlow
- id_token: Implicit Flow
- token: Implicit Flow
- id_token token: Implicit Flow
- code id_token: Hybrid Flow
- code token: Hybrid Flow
- code id_token token: Hybrid Flow
Once the user is redirected to the Authorization Endpoint, the Authorization Server initiates the authentication process. The user may be prompted to log in or provide consent for the client application to access their identity information. If the user successfully authenticates and grants consent, the provider generates anAuthorization Code(in the case of theAuthorization Code Flow) or directly issues an ID Token and/or Access Token (in the case of the Implicit Flow or Hybrid Flow). The provider then redirects the user’s browser back to the redirect URI specified by the client application, appending the relevant tokens or code as query parameters.
The client application can now use the obtained tokens to authenticate the user and access information on the user’s behalf.
In summary, the Authorization Endpoint is responsible for initiating the authentication process, obtaining user consent, and issuing tokens or an Authorization Code that allows the client application to authenticate the user and access their identity information in a secure and standardized manner.
The Token Endpoint (uses the following URL format https://example.com/token{?grant_type,code,redirect_uri,client_id,client_secret,refresh_token,scope}) is used by the client application to exchange the authorization grant received from the Authorization Endpoint for an ID Token, an Access Token, and optionally a Refresh Token. This endpoint is typically accessed via a secure back-channel, meaning that the client’s credentials (client_id and client_secret) are sent directly to the Token Endpoint to authenticate the client. The response from this endpoint includes the requested tokens.
The Token Endpoint accepts several parameters as part of the token request made by the client application. These parameters are sent in the body of the HTTP POST request when the client exchanges the authorization grant for tokens. Here are the main parameters that the Token Endpoint can accept:
- grant_type: This parameter specifies the type of grant being used to request tokens. The value for OpenID Connect token requests is typically authorization_code when using theAuthorization CodeFlow or refresh_token when requesting a new Access Token using a Refresh Token.
- code: Required for authorization_code grant type. This parameter contains theAuthorization Codeobtained from the Authorization Endpoint.
- redirect_uri: Required for authorization_code grant type. This parameter must match the redirect URI used during the authorization request.
- client_id: The client identifier issued by the authorization server when the client application was registered.
- client_secret: Required for clients capable of keeping the client secret confidential. This parameter authenticates the client application at the Token Endpoint.
- refresh_token: Required for refresh_token grant type. This parameter contains the refresh token previously issued to the client, which is used to obtain a new Access Token.
- scope: An optional parameter specifying the requested scope of the access token. It indicates the level of access requested by the client application.
The Token Endpoint responds with the requested tokens, including an ID Token, an Access Token, and a Refresh Token, based on the grant type. It’s important to note that availability and requirements of specific parameters may vary and depends on the configuration of the authorization server. However, the standardized naming, parameters and output formats specified in OpenID Connect provide developers with clear guidelines, making it easier for them to implement and integrate authentication with OpenID Connect providers. In contrast, the OAuth 2.0 specifications leave such decisions to the developers, granting them more flexibility but potentially leading to varying implementations and interoperability challenges.
The security of OpenID Connect has been engineered with the following considerations in mind:
- The Authorization Code is designed to be short-lived and usable only once. If the client were to use the Authorization Code directly to access the token endpoint, there’s a higher risk of exposing the code to unauthorized parties during the communication. By exchanging it for an access token at the token endpoint, the client can keep the code confidential and minimize the window of opportunity for potential attackers to intercept it.
- Access Token also has a limited lifespan to minimize the potential impact if they get compromised. When the Access Token expires, the client can use the Refresh Token to obtain a new Access Token without requiring the user’s consent again. This provides a seamless user experience while maintaining security.
The OpenID Connect specification describes three authorization flows:
- Authorization Code Flow
- Implicit Flow (deprecated)
- Hybrid Flow
Authorization Code Flow
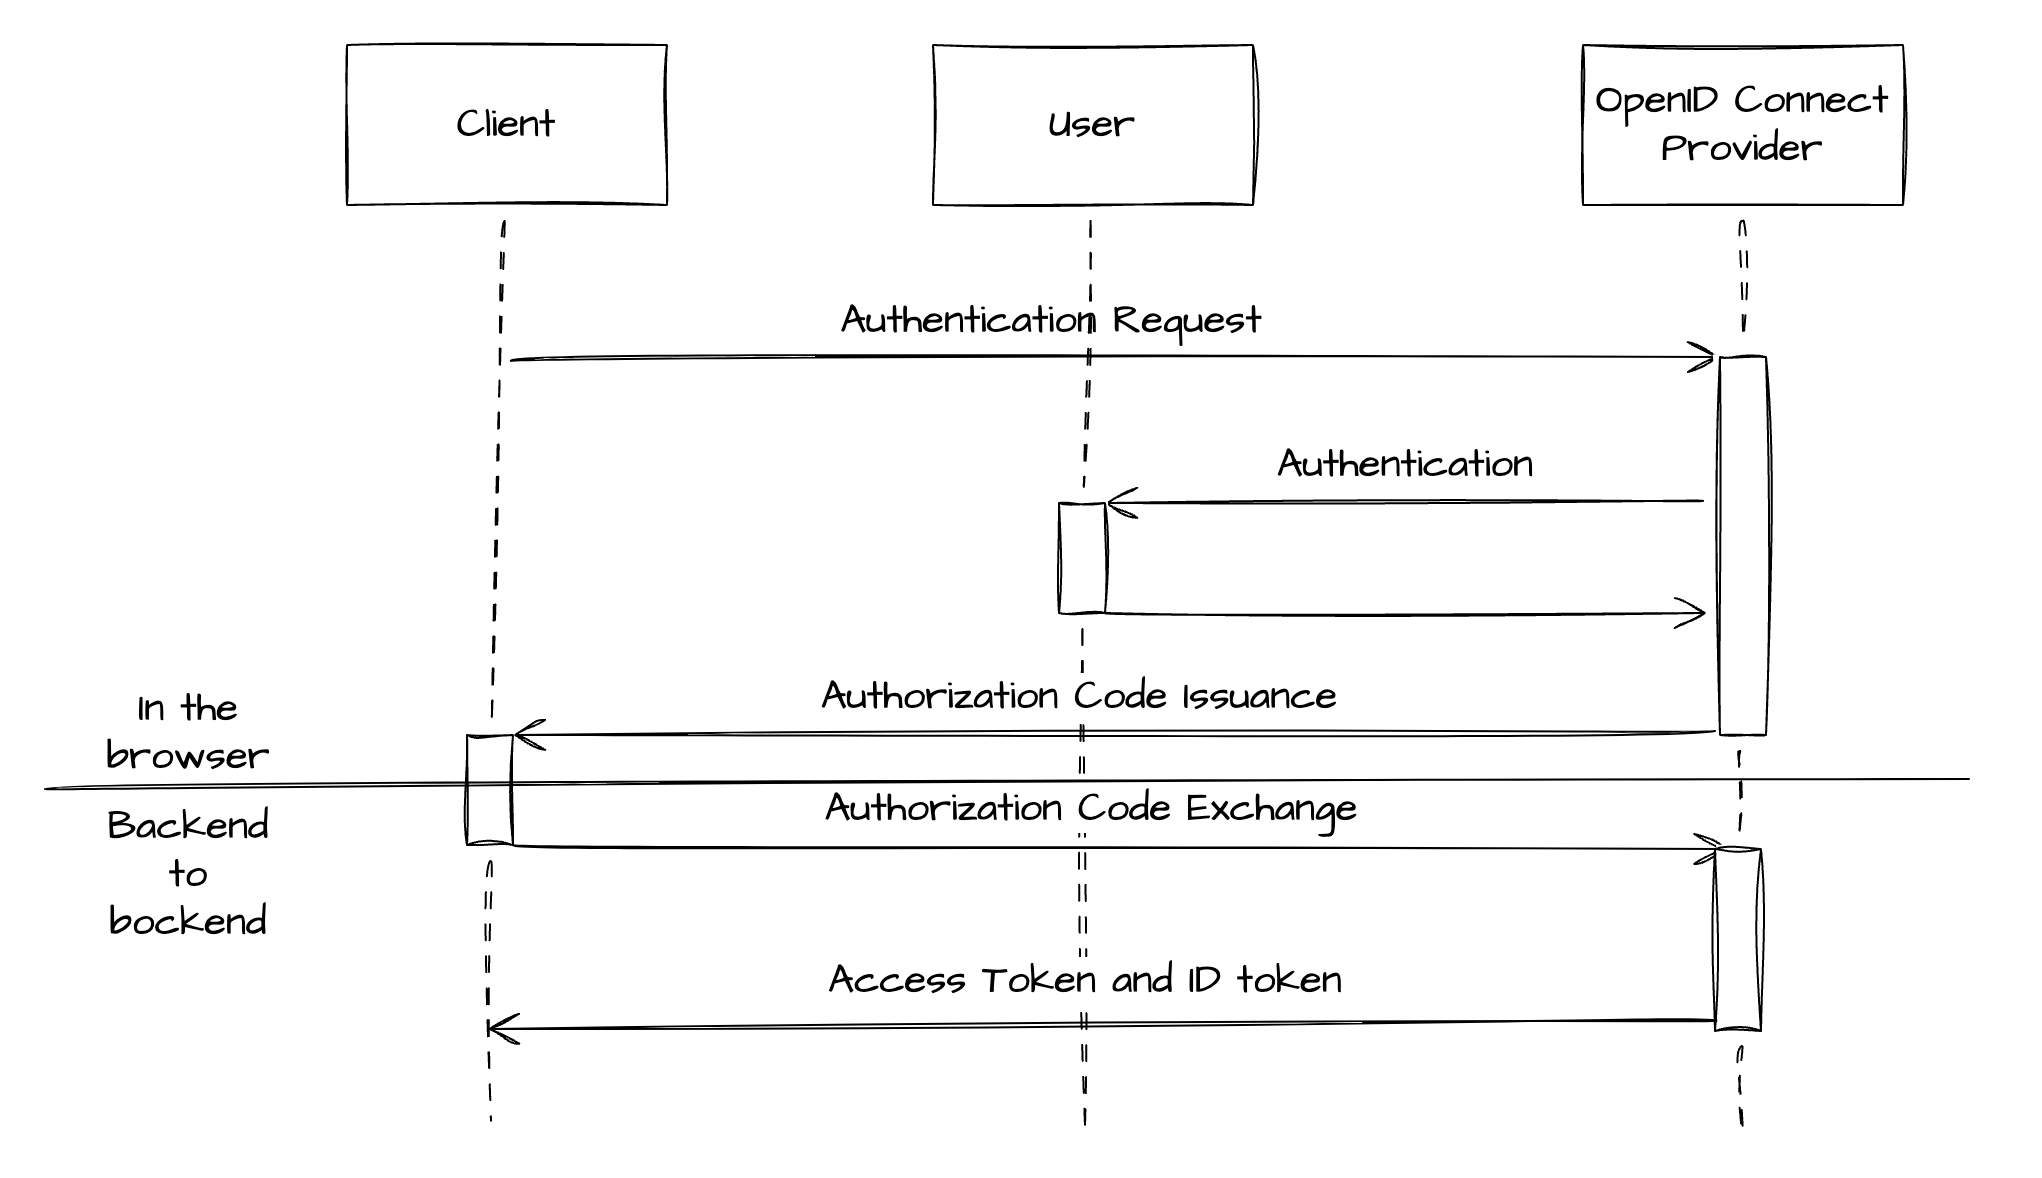
The Authorization Code Flow is one of the most commonly used flows in OpenID Connect for server-side applications. This flow is designed to obtain both an Access Token and an ID Token from the authorization server, allowing the client to authenticate the user and authorize access to the requested resources.
Let’s consider an example of a web application that uses Google to authenticate its users via OpenID Connect’s Authorization Code Flow.
-
User Authentication Request: When a user attempts to log in, the web application (client) redirects the user’s browser to Google’s authorization server with a URL that includes query parameters such as
client_id(the application’s ID),response_type=code(indicating that the application wants an Authorization Code),scope=openid(requesting identity via OpenID Connect), andredirect_uri(the URL to which the user will be redirected after authorization). -
User Consent: Google authenticates the user, typically through a login prompt, and asks the user to authorize the requested permissions (in this case, to share their identity information with the web application).
-
Authorization Code Issuance: After the user consents, Google redirects the user back to the web application, appending an Authorization Code to the
redirect_uri. -
Authorization Code Exchange: The web application then makes a POST request to Google’s token endpoint, including the Authorization Code and its
client_idandclient_secretfor authentication. -
Access and ID Token Response: Google’s server verifies the Authorization Code and the client credentials, and if valid, responds with an access token and an ID token.
-
Accessing User Information: The web application can now use the access token to access Google APIs on behalf of the user, and the ID Token (which is a JWT containing identity information about the user) to authenticate the user within the application.
This flow ensures that tokens are never exposed directly to the user’s web browser, enhancing the security of the user’s data.
From the end-user’s perspective, the Authorization Code Flow experience is quite seamless and straightforward. Here’s how it unfolds for the above example:
-
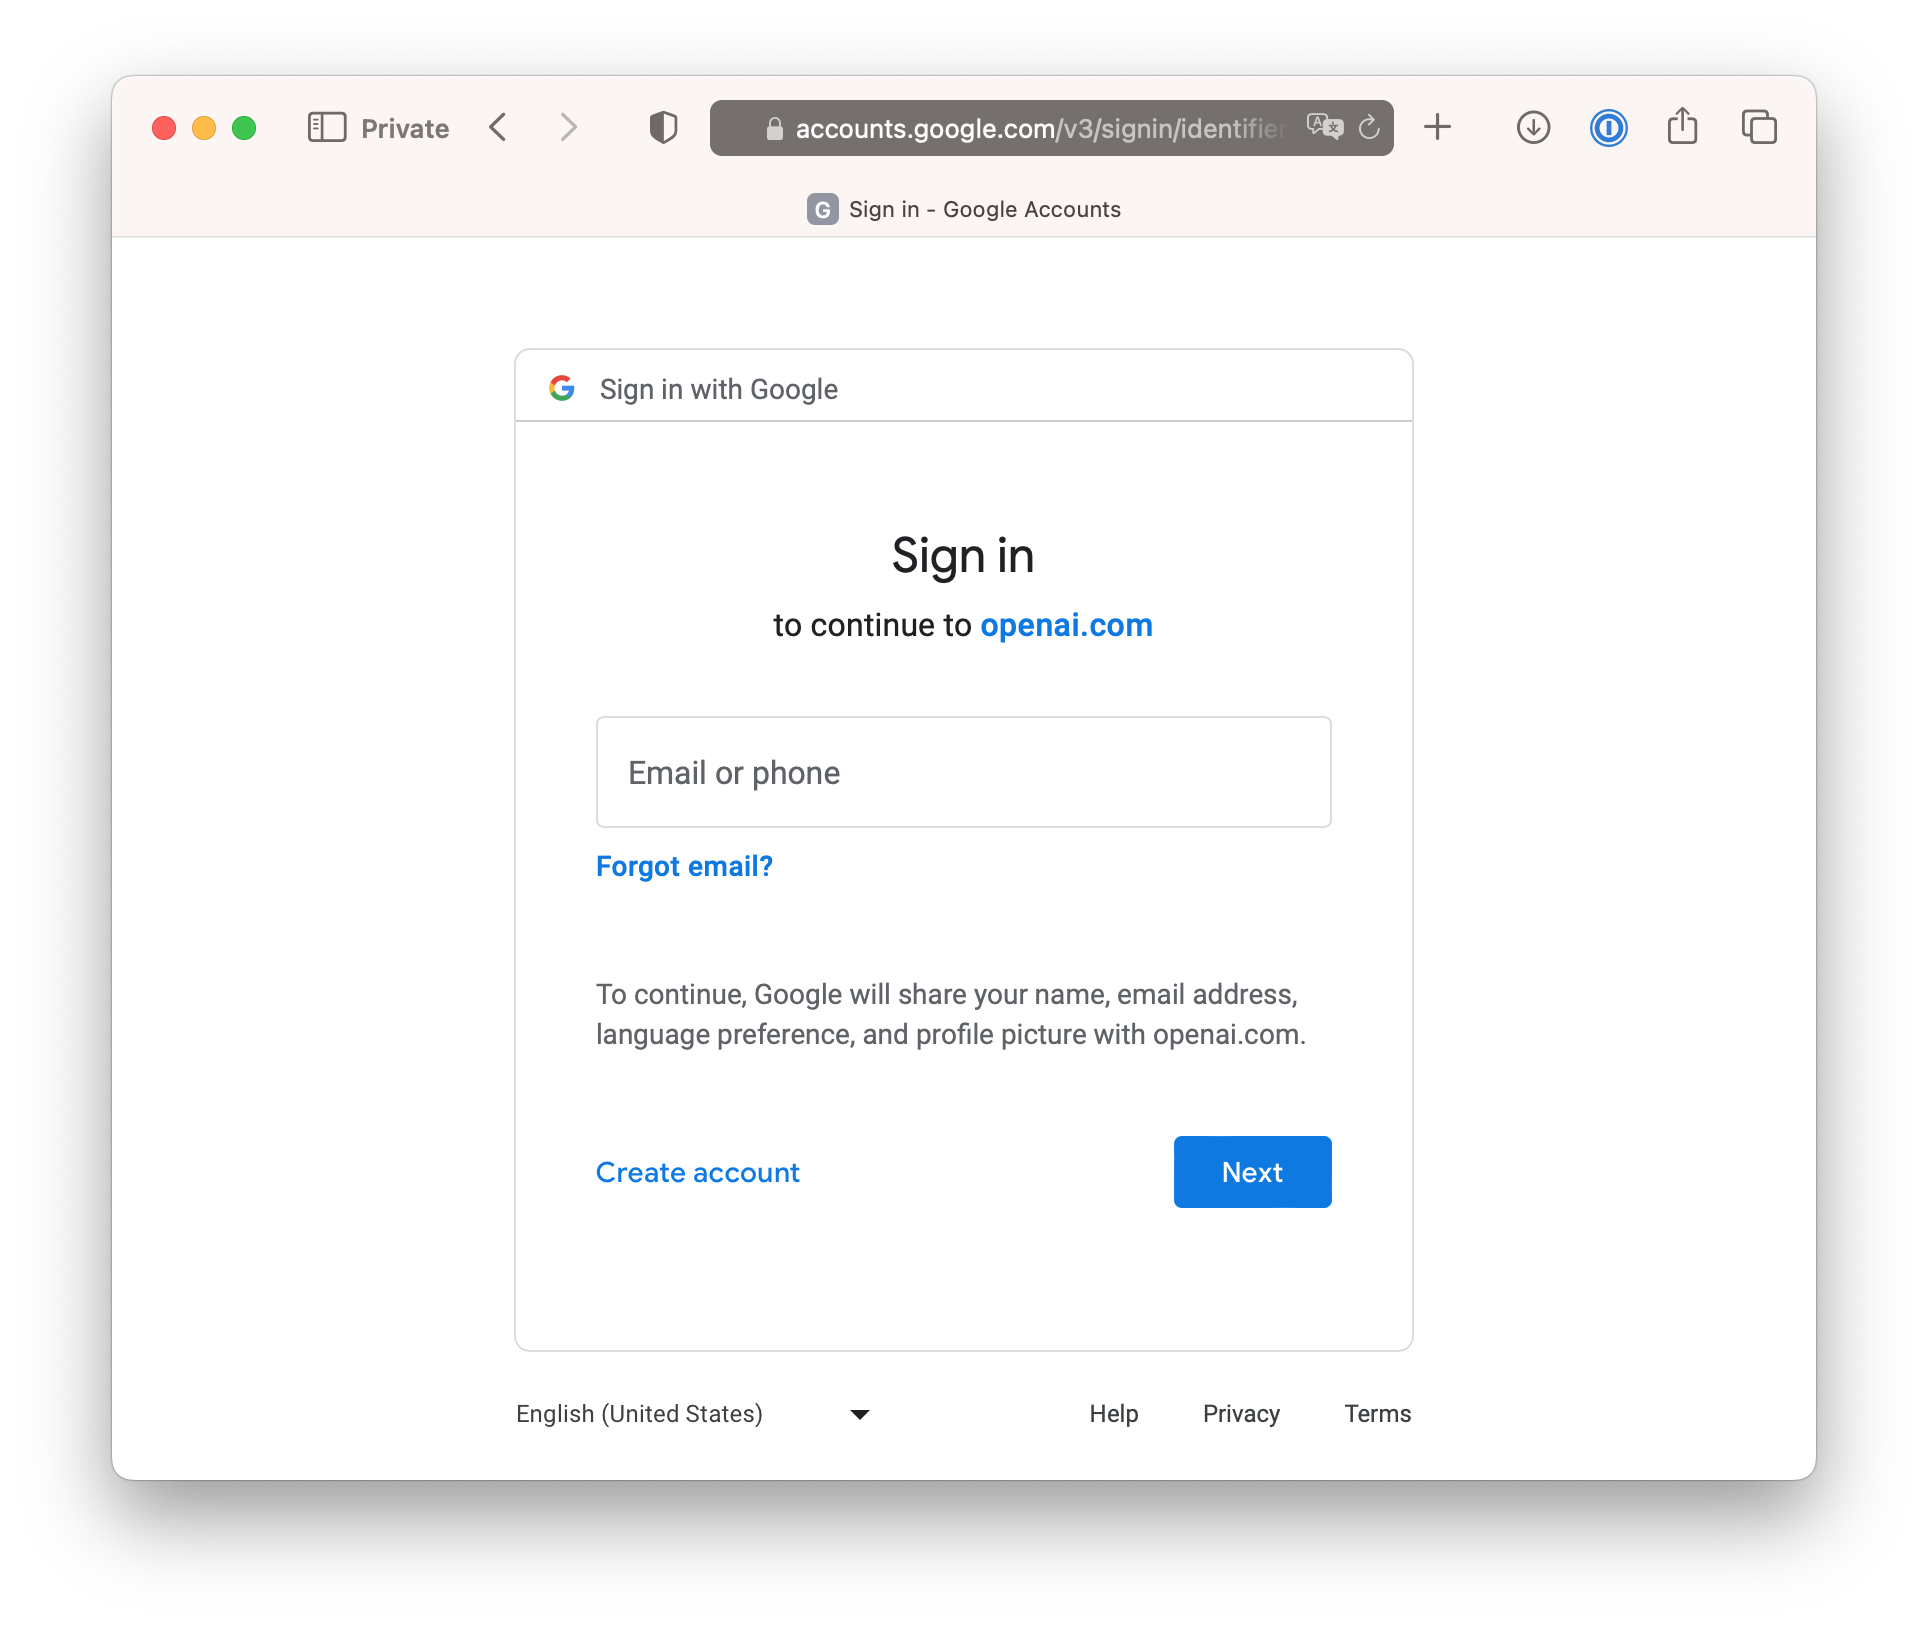
Initiation: The user initiates the process by clicking a “Sign in with Google” (or whichever identity provider is being used) button on the web application.
-
Redirection: The user’s browser is then redirected to the login page of the Google’s login page.
-
Authentication: The user enters their credentials (like their username and password) to log in. If they’re already logged in (for instance, in another tab), this step might be skipped.
-
Consent: After successful login, the user is presented with a consent screen. This screen informs the user about the data and permissions the web application is requesting. The user can then choose to grant or deny these permissions.
-
Completion: Once the user grants the permissions, they are redirected back to the web application. The redirection URL typically includes an Authorization Code as a parameter.
-
Access: Behind the scenes, the web application exchanges the Authorization Code for an Access Token and an ID Token. The user is now logged in to the application and can start interacting with it.
The entire process is designed to be quick and seamless, providing a smooth user experience while ensuring the secure handling of user data.
Implicit Flow (deprecated)
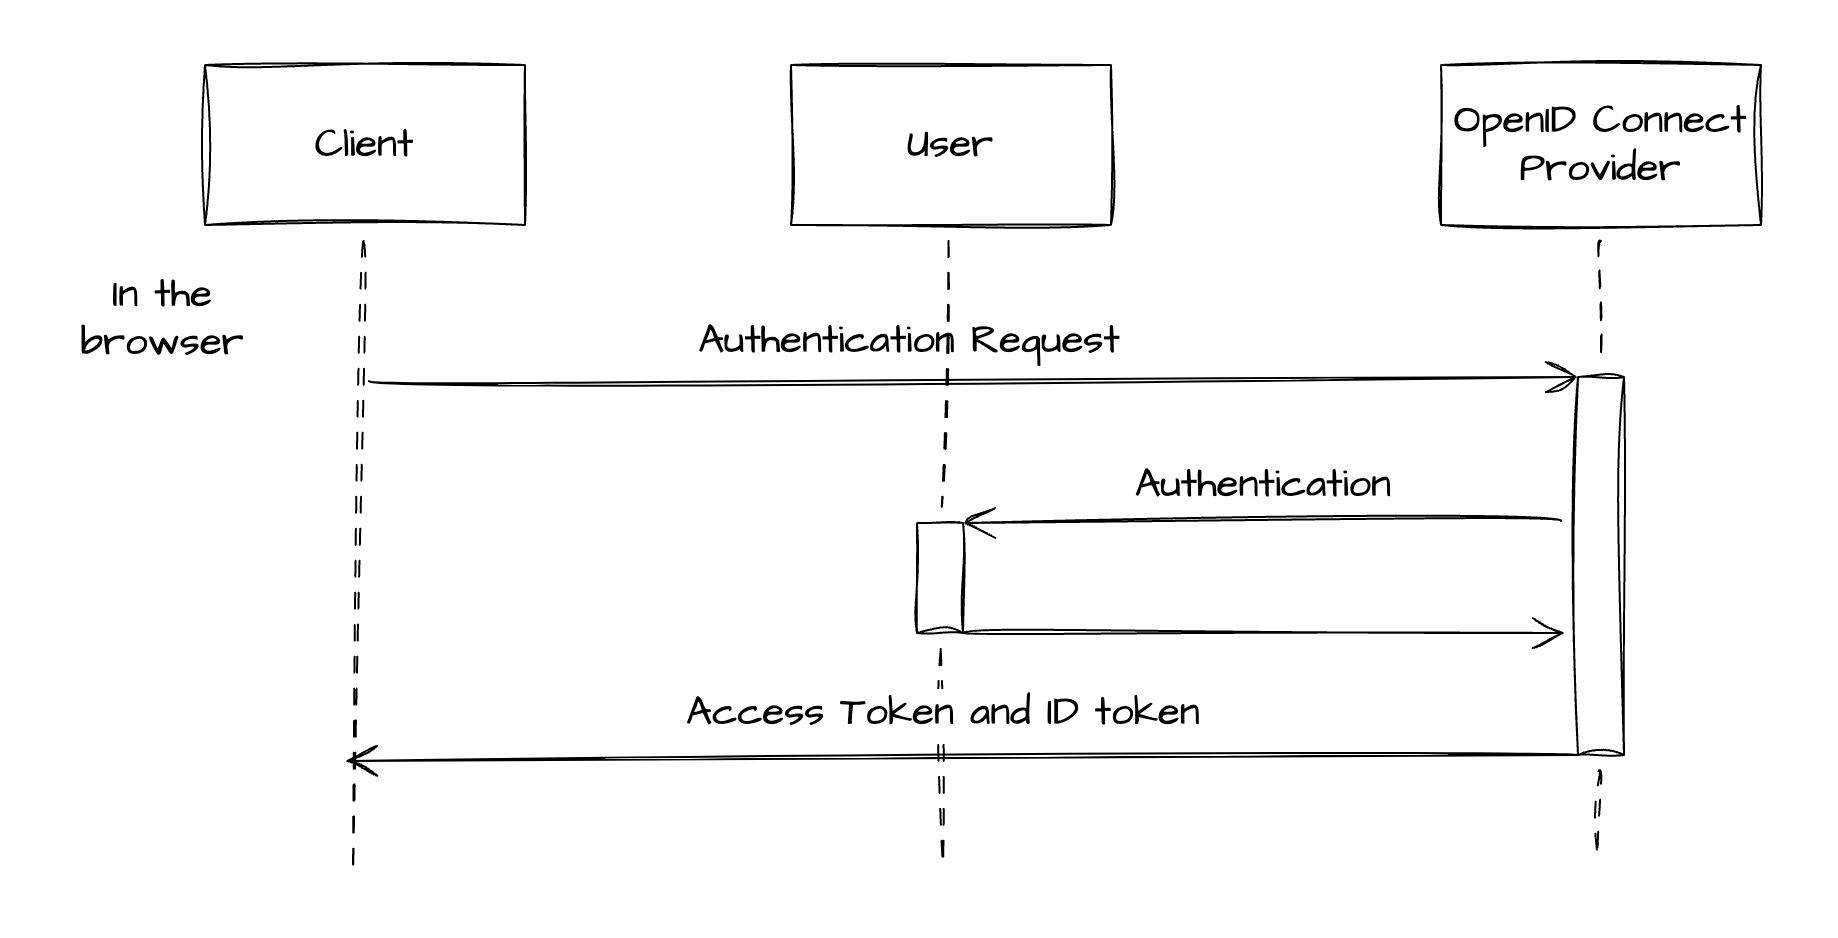
The Implicit Flow is a simplified authorization method in OpenID Connect optimized for clients implemented in a browser. This flow was created to simplify the interaction of the Authorization Code Flow, making it more suitable for public clients, where client credentials cannot be securely stored.
In the Implicit Flow, instead of receiving an Authorization Code that needs to be exchanged for an Access Token, the client directly receives an Access Token as a result of the authorization request.
Let’s consider an example of a Single Page Application (SPA) that uses Facebook for user authentication via OpenID Connect’s Implicit Flow.
-
User Authentication Request: When a user attempts to log in, the SPA (client) redirects the user’s browser to Facebook’s authorization server with a URL that includes query parameters such as
client_id(the application’s ID),response_type=id_token token(indicating that the application wants both an ID token and an access token),scope=openid(requesting identity via OpenID Connect), andredirect_uri(the URL to which the user will be redirected after authorization). -
User Consent: Facebook authenticates the user, typically through a login prompt, and asks the user to authorize the requested permissions (in this case, to share their identity information with the SPA).
-
Token Issuance: After the user consents, Facebook redirects the user back to the SPA, appending both the ID Token and the Access Token to the
redirect_uri. -
Accessing User Information: The SPA can now extract these tokens directly from the URL. It can use the access token to access Facebook APIs on behalf of the user, and the ID Token (which is a JWT containing identity information about the user) to authenticate the user within the application.
In this flow, the tokens are exposed to the user’s browser, which can be a potential security concern, especially if the application is not served over HTTPS. However, it provides a simplified flow for public clients where the tokens can’t be securely stored and the server-side code execution is not possible.
From the user’s perspective, the Implicit Flow is quite similar to the Authorization Code Flow. Here’s how it typically looks:
-
Initiation: The process begins when the user clicks on a “Sign in with Facebook” (or whichever identity provider is being used) button on the application.
-
Redirection: The user’s browser is then redirected to the Facebook’s login page.
-
Authentication: The user enters their credentials to log in. If they’re already logged in (for instance, in another tab), this step might be skipped.
-
Consent: After successful login, the user is presented with a consent screen. This screen informs the user about the data and permissions the application is requesting. The user can then choose to grant or deny these permissions.
-
Completion: Once the user grants the permissions, they are redirected back to the application. However, unlike the Authorization Code Flow, the redirection URL now includes the Access Token and ID Token.
-
Access: The application extracts these tokens from the URL, and the user is now logged in to the application and can start interacting with it.
⚠️ While the Implicit Flow simplifies the process by eliminating the need for an Authorization Code exchange, it exposes tokens to the user’s browser returning tokens in the URL fragment, which has potential security risks, such as exposing the tokens in the browser’s history and potentially being accessible to malicious JavaScript. This could lead to token leakage and unauthorized access. For this reason, the use of Implicit Flow considered deprecated, and its usage is discouraged.
Authorization Code Flow with Proof Key for Code Exchange
Public clients like single-page and mobile applications can mitigate this security risk by using the Proof Key for Code Exchange (PKCE) extension of OAuth 2.0 framework that enhances the security of the Authorization Code Flow.
PKCE introduces an elegant security step before exchanging the Authorization Code for tokens. When initiating the Authorization Code Flow with PKCE, the client generates a random code_verifier and calculates its SHA-256 hash value, known as the code_challenge. The code challenge is included in the authorization request to the authorization server. The authorization server stores the code challenge and associates it with the issued Authorization Code. It returns the Authorization Code as usual but requires the client to present the original code_verifier when exchanging the code for tokens.
Since the code_verifier is random, single-use, and never shared outside of the application, it makes impossible for attackers to exchanging an intercepted Authorization Code for tokens. This extension makes Authorization Code Flow suitable for public clients.
Hybrid Flow
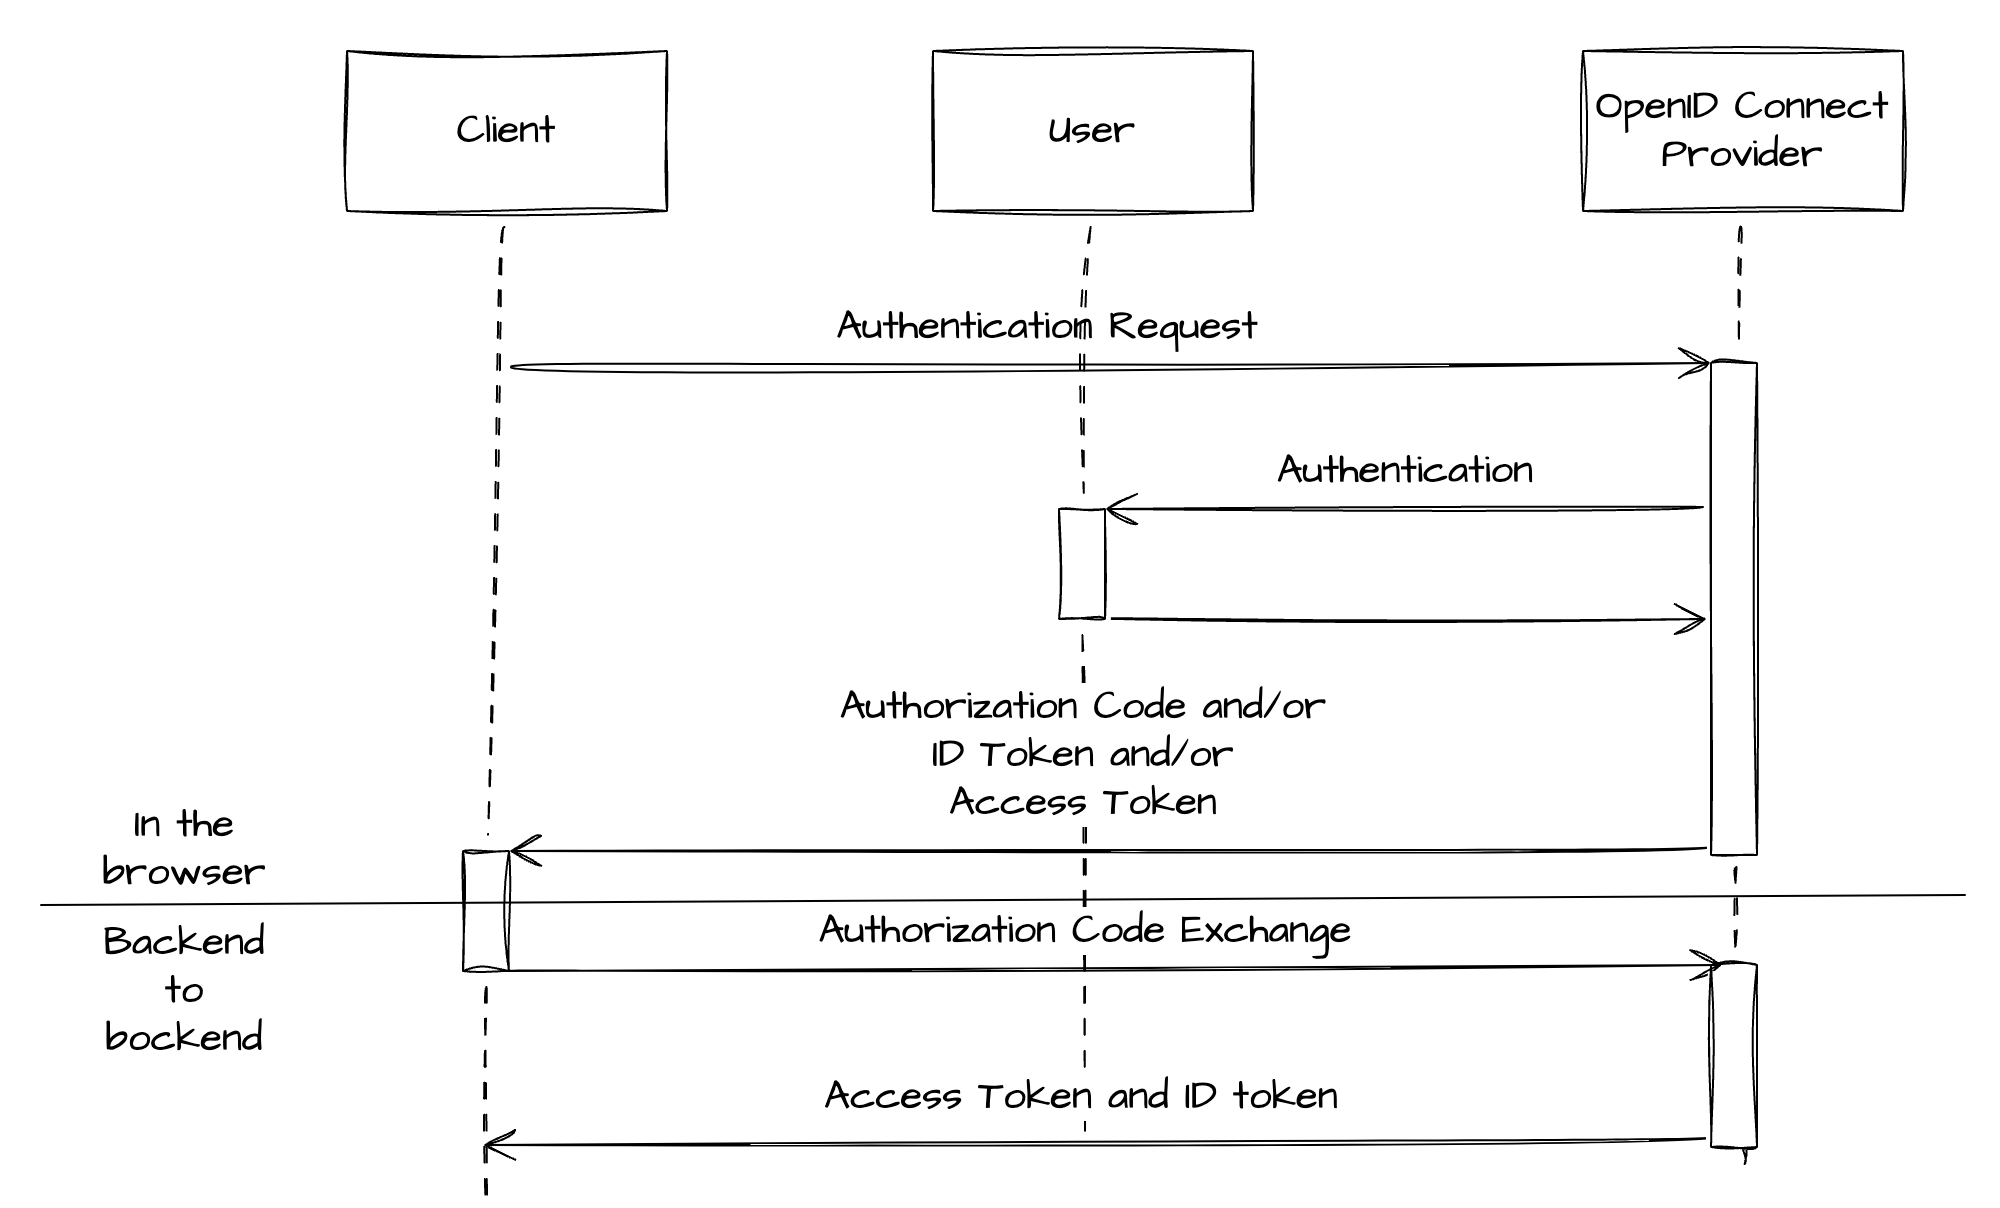
The Hybrid Flow in OpenID Connect combines aspects of the Authorization Code Flow and the Implicit Flow. This flow is particularly useful for clients that want to obtain tokens for use at both the front-end and back-end. It allows the client to receive some tokens directly from the authorization endpoint, and optionally, use an Authorization Code to obtain other from the token endpoint.
Let’s consider an example of a mobile application that uses LinkedIn for user authentication and also needs to access LinkedIn APIs from the server-side. This application can use OpenID Connect’s Hybrid Flow.
-
User Authentication Request: When a user attempts to log in, the mobile application (client) redirects the user’s browser to LinkedIn’s authorization server with a URL that includes query parameters such as
client_id(the application’s ID),response_type=code id_token(indicating that the application wants both anAuthorization Codeand an ID token),scope=openid(requesting identity via OpenID Connect), andredirect_uri(the URL to which the user will be redirected after authorization). -
User Consent: LinkedIn authenticates the user, typically through a login prompt, and asks the user to authorize the requested permissions (in this case, to share their identity information with the mobile application).
-
Token Issuance: After the user consents, LinkedIn redirects the user back to the mobile application, appending both the Authorization Code and the ID Token to the
redirect_uri. -
Authorization Code Exchange: The mobile application can use the ID Token to authenticate the user on the device. It then sends theAuthorization Codeto its server. The server makes a POST request to LinkedIn’s token endpoint, including theAuthorization Codeand its
client_idandclient_secretfor authentication. -
Access Token Response: LinkedIn’s server verifies the Authorization Code and the client credentials, and if valid, responds with an Access Token (and optionally a Refresh Token).
-
Accessing User Information: The server can now use the Access Token to access LinkedIn APIs on behalf of the user.
In this flow, the mobile application can authenticate the user, and the server can securely obtain an Access Token to call APIs, providing a balance of performance and security.
From the user’s perspective, the Hybrid Flow looks similar to the Authorization Code Flow and Implicit Flow.
Summary
While OpenID and OAuth started as separate protocols for different purposes, they have seamlessly merged with the advent of OpenID Connect.
OpenID Connect, built on top of OAuth 2.0, provides a comprehensive and standardized approach to secure user authentication and authorization. By leveraging OAuth 2.0 extensions, OpenID Connect offers identity discovery and standardized claims, making it the go-to choice for OAuth 2.0 implementations.
For public clients, the Authorization Code Flow with Proof Key for Code Exchange ensures a secure exchange of tokens, safeguarding against potential security risks. The Hybrid Flow combines the best of both worlds, providing a versatile solution for clients that need tokens for both front-end and back-end operations.
With wide adoption by major industry players, OpenID Connect has become a trusted and reliable solution for authentication and authorization needs in modern applications. By understanding the strengths and nuances of these protocols, developers can make informed decisions, ensuring the security and seamless user experience of their applications.